- English
- Türkçe
Cisco Webex for e-School
With the initiation of the distance education process, Cisco Webex application was temporarily opened for use by our University in order to meet the online meeting and web conferencing needs that may be experienced in addition to the courses. Registered users can create meetings and invite unregistered people to the meeting.
The registration process required for the application to be used is carried out by the Computer Center.
In order to apply, the pre-registration form at https://bidb.metu.edu.tr/forms/cisco-webex-kullanimi must be filled out. You can access the form with your METU user code and password. The pre-registration form is accessible to our faculty members. Currently, research assistants and part-time faculty members do not have access.
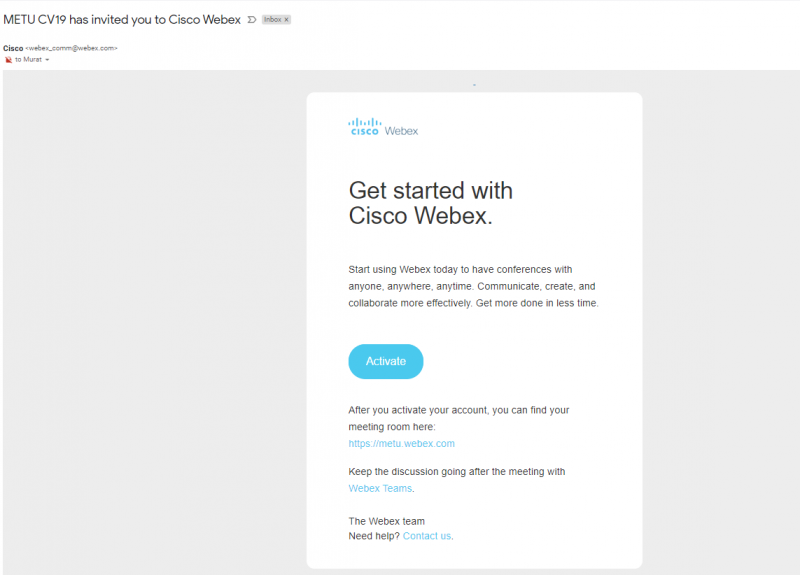
When you click the "Submit" button on the pre-registration form, your membership request will be received and a message will be sent to your METU corporate e-mail address for your membership to start to use Webex. (Registration cannot be done automatically. Your registration will be done as soon as possible.)
After the registration confirmation is done by the Computer Center, you can create your password with the link in the e-mail you will receive, download the program from the left-hand menu at https://metu.webex.com and start the meeting.
Participation of Students to the Course / Web Conference:
Students do not need to have a Webex account to participate in the course. They can join as a guest.
Students can install the Webex application on their mobile device, tablet or PC at https://metu.webex.com. Clicking on the link in the course invitation sent by the teacher through various communication channels (e-mail, METUClass, etc.), this application is automatically opened and participation is provided.
If the students click on the link to be sent without installing any application, they can participate in the training via the web browser. The student participates in the course by entering his / her name, surname and e-mail address.
Note: Some old version web browsers may not connect to Webex. In this case, the student will need to install the free Webex application.
Online Meeting / Web Conference Use for Teachers:
1 - Account Activation E-mail
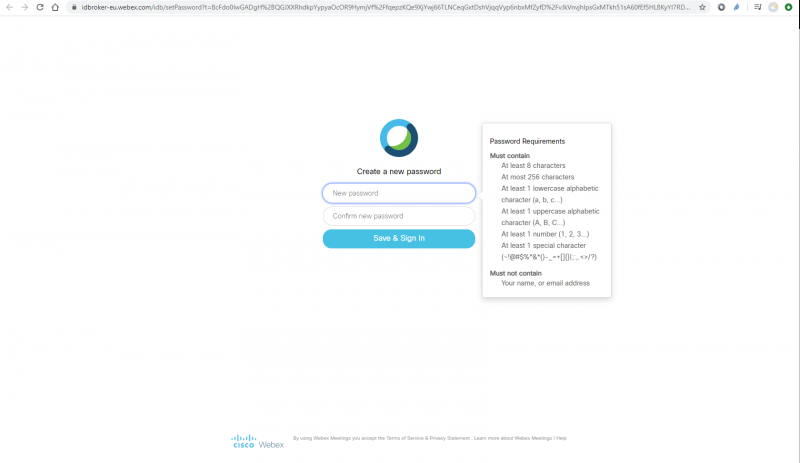
2- Password Creation Page
3- Webex Application Download Page
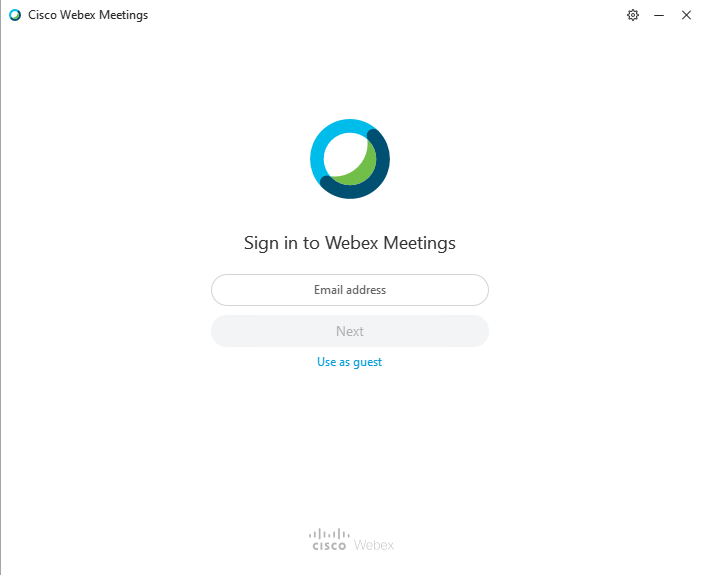
You can download and install the Webex application according to the type of your operating system from the page that comes after creating your password. You can also install Webex for mobile devices and tablets from app stores (Google Play, Apple Store). It is possible to use https://metu.webex.com to access related pages later.

4- Webex Login Page
After installing the application you downloaded on your device, run it and enter your METU corporate e-mail address. In the next step, enter your password created for Webex.
5- Webex Site Selection
You should select metu.webex.com address as Webex Site.

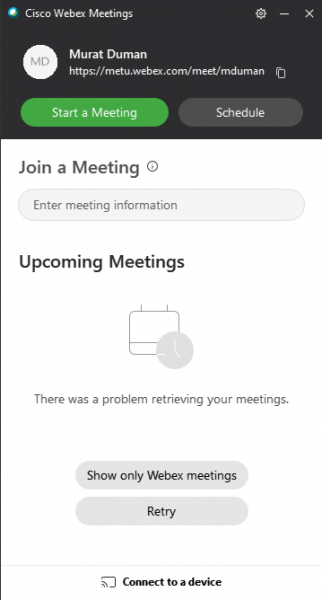
6- Webex Meeting Screen - Start a Meeting
If your login information is correct, the application will open. You can select the Start Meeting option to start a meeting. If you are going to be a participant, enter your meeting information given to you in the "Joining a Meeting" section.
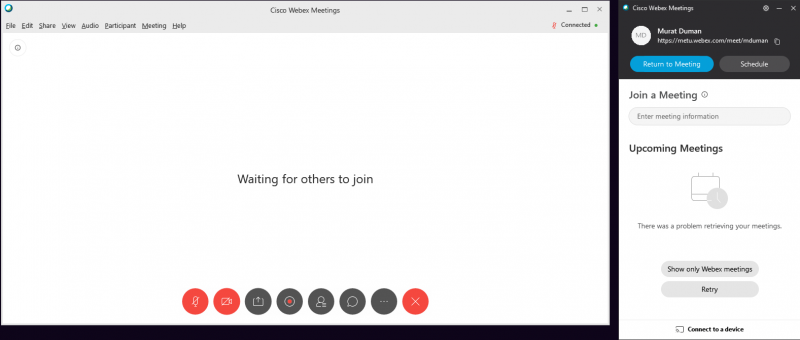
7- Webex Meetings - Meeting Screen
After pressing Start Meeting, screens related to camera and microphone settings may appear, you can continue by checking the settings here. If someone else has not yet joined your meeting, a white screen with the text "Waiting for others to join" will appear.
8- Webex Meetings - Invitees to the Meeting
When the people you invite join the meeting, the audio and video of the participants are enabled due to the Webex default settings. If the guests did not turn off their audio and video on their settings before connecting to the meeting, you can change them as the Host.
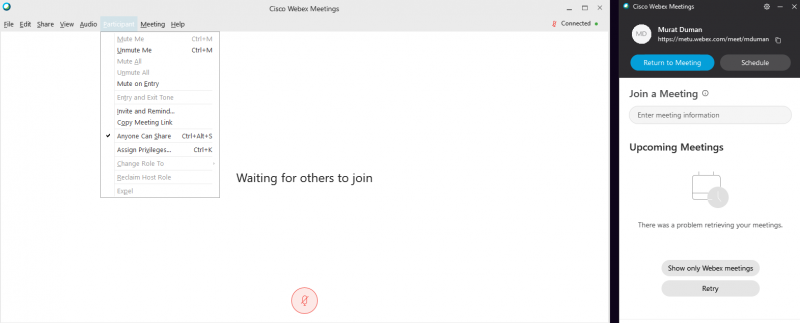
9 -Webex Meeting - Participant Menu
If you turn off "Anyone Can Share" feature from the "Participant" menu of the application, only you or the participants you have privileged will be able to share.
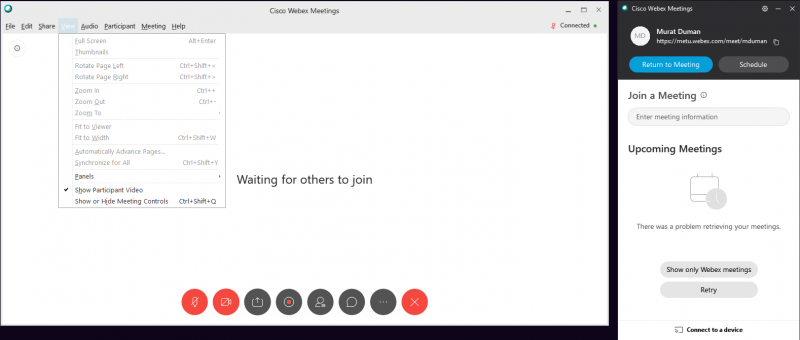
10 Webex Meeting - View Menu
You can turn off the video of the participants by turning off the "Show Participant Video" feature from the View menu.
About Cisco Webex
Webex is an optimal solution for smartworking and distance learning.
This document takes into account two main scenarios that are addressed by specific Webex applications for each scenario:
Distance lesson (virtual class)
Focus on real-time collaboration between teacher and students with audio/video, application sharing, multimedia content, annotation and polls: Webex Meetings.
In this scenario, students can join the lesson in guest mode, that is, without having to create a Webex account.
Collaboration between teachers and staff of the School Institute
Advanced document chat and sharing capabilities in a more structured environment in addition to audio/video collaboration and screen sharing: Webex Teams.
Description of the setup process (preliminary)
Teacher
The teacher receives the welcome email -> click to set the password and install the Webex Meetings app
Student
The student installs Cisco Webex Meetings on their iPad/tablet/mobile device without having to create a Webex account
Setup for the teacher
Click "activate" in the welcome email
The browser opens, allowing the teacher to enforce their password
The Webex page loads in the browser
Click "Download" to download the Webex Meetings App and install it
Teacher login
Launch the Webex Meetings app on your PC and log in using your Webex credentials (email address and password)
Virtual lesson
The virtual lesson takes place in a virtual classroom represented by the so-called "Personal Room" or personal room of the teacher.
This room represents the physical class of the school and the Personal Room provides digital tools that allow an advanced collaboration between teacher and students. Teachers can share their PC screen, show documents, applications, and even multimedia content.
The Personal Room is run by the teacher. The teacher initiates the lesson by allowing the students to participate. The teacher can also mute or even expel one or more students and can record the lesson itself, to allow students who are absent to enjoy it later. The teacher can lock (equivalent to locking the classroom door) to prevent other students from connecting and finally, it is always the teacher who has the power to finish the lesson, closing the Personal Room.
How to use:
The professor organizes the video conference for the class using the link to Webex
The professor copies the Webex link of his/her Personal Room from the Webex app
The professor shares the link with the class through the most appropriate tool (electronic register, email etc)
At the indicated time, the professor starts the meeting; students participate by clicking on the received link
Students who connect in advance (before the professor starts the meeting) are waiting. They are equally waiting when the professor locks the meeting.
Lesson in progress (teacher side)
Clicking on "Start Meeting" (see slide above) starts the video preview to allow the teacher to verify that his video is ok.
Clicking again on "Start Meeting" starts the actual lesson, with audio and video. As long as no student has connected Webex shows the white screen, with the teacher's video at the bottom of the page.
Student Participation
Premise: The student installed the Webex Meetings app and received, by email for example, the link to the lesson (link of the Personal Room)
Clicking on the link launches the Webex app
The student enters their first and last name and an email address -> click on "join meeting"
(note: Webex account is not required, so no password is needed, and the email is purely informative)
The preview starts -> click "Join" to enter the virtual class
Note: With a non-standard browser, you may need to open the Webex Meetings app and insert the link to the lesson.
Lesson control (for the teacher)
The teacher can, through the list of participants, mute and possibly even expel the students individually.
In addition, the teacher can turn off the camera during the lesson, share content, read what is written on chat screen, write a reply, survey (polling), share screen or application.
The teacher can, at any time, block access to the Personal Room by preventing additional participants (e.g. students of a different class) from entering. In the same way, the teacher can unlock it at any time.
Only the teacher can finish the lesson. The teacher is also entitled to leave the Personal Room without the lecture ending, but in this case he will have to indicate another participant to take the lead on his/her behalf.
You can e-mail to odtuclass@metu.edu.tr for your questions and issues about Cisco Webex.